About me

I have been making fabric crafts since the 70s, started hand piecing and quilting in the 80s, and have been machine piecing for the last seven years. My pile of UFO tops are slowly diminishing with the help of my longarm quilting machine, an Ansley 26.

Friday, January 7, 2011

Disappearing 4 patch


Have you tried the disappearing four patch yet. It is all in the cut and twist. Check it out.

Twister wreath


Here is the lil Twister Wreath. Layout is 25 squares with 5 white squares forming a cross in the center prior to cutting.

I was going to make these for Christmas gifts but since I only had one week to make 7 gifts I decided I would be the only one receiving this ! :)

Additional Twister


I made a second lil twister as I had another 13 blocks still to use. This time I put colored squares that read as tone on tones between the butterfly squares. I did not use the corner blocks so there are no partial pieces in the corners.


This one looks more like an Escher puzzle.

Sunday, January 2, 2011

Lil twister


Well, there were scraps of butterfly fabric left and I couldn't throw anything away. So I cut the leftovers into 4.5" squares and started the process again. Except I made some changes in my layout from the first quilt top.

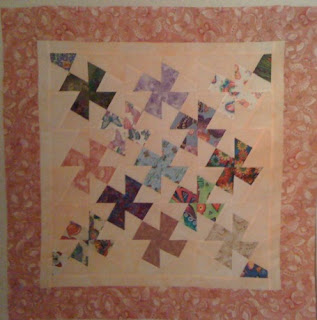
I had enough leftovers to make two wallhangings. I took 13 squares and added squares of a hand dyed batik between each butterfly square. Next, I added a batik border and started to cut up my fabric using my rotary cutter and the Lil Twister ruler. I found it challenging to cut around the smaller ruler with my cutter and instead, using a sharpened pencil, traced around my squares with the pencil, and then cut out the squares, some areas with the rotary cutter and some with scissors. The finished product went together much faster this way.

The border took longer for me to figure out then the piecing! I loved the more open looking tesselations on this one.

The Twister


I guess I haven't talked about how much I like the "twister". This quilt design goes right to a math teacher's heart...tesselations...M.C. Escher Ask my students...They all know his work.


You pick a square size (I first started with 10"...I have a pile of butterfly fat quarters and they cut up nicely into layer cakes) Use spray sizing and iron seams so that each row has seams going a different direction. That way they will nestle well together and corners will match. Piece them together in rows until you get a size you like. Add a border all around...mine was aboout 3.5". Then the fun part.


Take your quilt, lay the "twister" ruler (I purchased mine from http://www.quiltpatchlane.com/ )in the the upper left corner, matching seams with lines on ruler and keeping the "cs" in the lower right of the square. Cut around the square with your rotary cutter carefully. Keep working straight across, moving the ruler to the right, matching seams to the lines on the ruler. I found that as I cut each square I would reposition them on my design wall. Resew new squares being careful of the bias edges and the directions you are ironing your seams. Add borders as you desire.


Here is the picture of my first completed Twister top for 2011.